
Redux Toolkit Query (RTK Query)
In my current work, I use Redux Toolkit Query for efficient state management and data fetching. Let’s dive into how it works and how you can use it in your own projects!
This code is available on ReactToolkitQuery repo. Feel free to check it out!
Redux Toolkit Query (RTK Query)
1. What is Redux Toolkit Query?
RTK Query is a helper tool that we use when we need to fetch data from a server or send data to it.
For example, when playing a game, you might want to send your score to the server or retrieve your friends’ scores from the server.
RTK Query makes these tasks much easier!
2. Why do we need it?
When we communicate with a server manually, the process can be complicated.
- “Hey server, plz send it” -> Wait for the server’s response
- “Now that we have the data, let’s display it on the screen!”
Doing all of this manually is tedious and prone to errors.
RTK Query handles these processes automatically, making development easier and more efficient for us!
3. How do you use it?
Step1. Setting up the API
To use RTK Query, you first need to define how it will communicate with the server.
This means telling it how to send requests and handle responses.
1. Importing necessary functions
First, import the functions you need from Redux Tookit Query.
import { createApi, fetchBaseQuery } from "@reduxjs/toolkit/query/react";
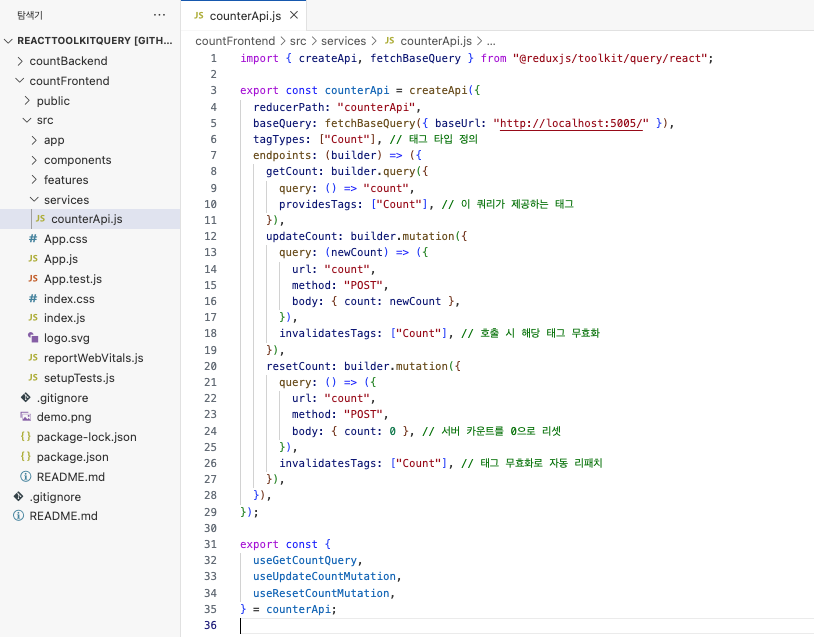
2. Defining the API
Next, define your API using createApi
export const counterApi = createApi({
  reducerPath: "counterApi",
  baseQuery: fetchBaseQuery({ baseUrl: "http://localhost:5005/" }),
  tagTypes: ["Count"], // Define tag types
  endpoints: (builder) => ({}),
});
3. Adding endpoints
Finally, add endpoints (queries and mutaions) to your API.
endpoints: (builder) => ({
  getCount: builder.query({
    query: () => "count",
    providesTags: ["Count"], // Provides tags for automatic cache invalidation
  }),
  updateCount: builder.mutation({
    query: (newCount) => ({
      url: "count",
      method: "POST",
      body: { count: newCount },
    }),
    invalidatesTags: ["Count"], // Invalidates tags to trigger refetch
  }),
});
Step2. Displaying the Data on the Screen
Now that we have set up our API using RTK Query, let’s see how we can display the data on the screen and update it both locally and on the server.
1. Importing necessary functions and hooks
First, import the required hooks and API-related functions.
import React from "react";
import { useSelector, useDispatch } from "react-redux";
import {
  useGetCountQuery, // it fetches the current count from the server
  useUpdateCountMutation, //it updates the count on the server
  useResetCountMutation, //it resets the count on the server
} from "../services/counterApi";

import {
  incrementLocal,
  decrementLocal,
  resetLocal,
} from "../features/counterSlice";

// useSelector: Retrieves the local count from the Redux store
// useDispatch: Dispatches actions to update the local state
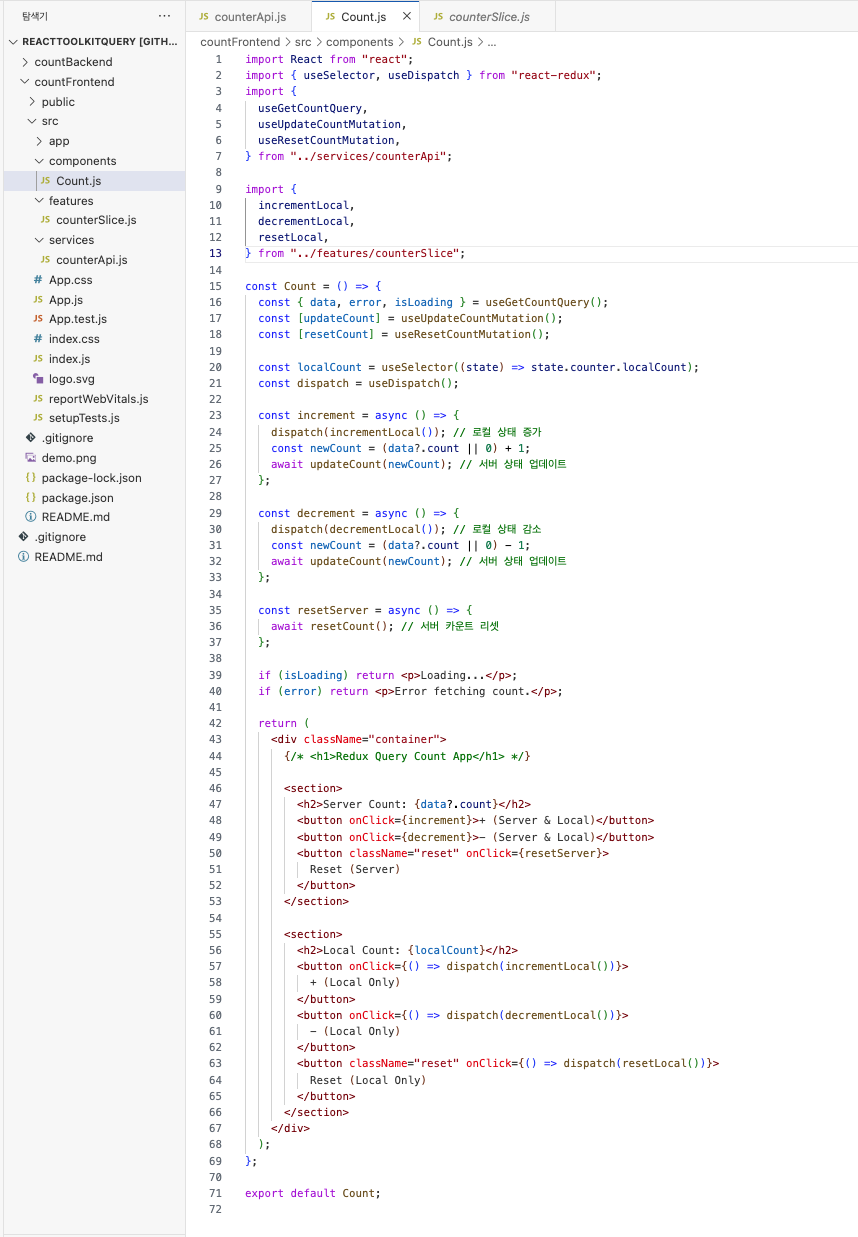
2. Setting up the component
Next, set up the count component to handle fetching, updating, and resetting the count.
const Count = () => {
  const { data, error, isLoading } = useGetCountQuery();
  const [updateCount] = useUpdateCountMutation();
  const [resetCount] = useResetCountMutation();

  const localCount = useSelector((state) => state.counter.localCount);
  const dispatch = useDispatch();
};
data, error, isLoading: These come from useGetCountQuery. They help manage the server state (loading, error, and data).
-
RTK Query automatically manages loading, error, and success states for you. When you call
useGetCountQuery, it provides:data: The fetched data from the server.isLoading: true when the request is in progress, and false when it completes.error: Any error that occurred during the request.
updateCount, resetCount: These mutations are used to update or reset the server count.
dispatch: Sends actions to update the local count in the Redux store.
3. Handling button actions
Here, we define functions to handle increment, decrement, and reset actions for both the server and local counts.
const increment = async () => {
  dispatch(incrementLocal()); // Increment local count
  const newCount = (data?.count || 0) + 1;
  await updateCount(newCount); // Update server count
};

const decrement = async () => {
  dispatch(decrementLocal()); // Decrement local count
  const newCount = (data?.count || 0) - 1;
  await updateCount(newCount); // Update server count
};

const resetServer = async () => {
  await resetCount(); // Reset server count
};
increment/decrement: These functions first update the local count using dispatch, then update the server count using the mutation.
resetServer: Resets the count on the server by calling resetCount.
4. Handling loading and error states
Before rendering the UI, we handle possible loading and error states.
if (isLoading) return <p>Loading...</p>;
if (error) return <p>Error fetching count.</p>;
5. Rendering the UI
Finally, render the UI to display both the server and local counts with buttons to update them.
return (
  <div className="container">
    <section>
      <h2>Server Count: {data?.count}</h2>
      <button onClick={increment}>+ (Server & Local)</button>
      <button onClick={decrement}>- (Server & Local)</button>
      <button className="reset" onClick={resetServer}>
        Reset (Server)
      </button>
    </section>

    <section>
      <h2>Local Count: {localCount}</h2>
      <button onClick={() => dispatch(incrementLocal())}>+ (Local Only)</button>
      <button onClick={() => dispatch(decrementLocal())}>- (Local Only)</button>
      <button className="reset" onClick={() => dispatch(resetLocal())}>
        Reset (Local Only)
      </button>
    </section>
  </div>
);
Server Count Section:
Displays the count fetched from the server. Includes buttons to increment, decrement, and reset the server count.
Local Count Section:
Displays the local count managed by Redux. Includes buttons to increment, decrement, and reset the local count without affecting the server.
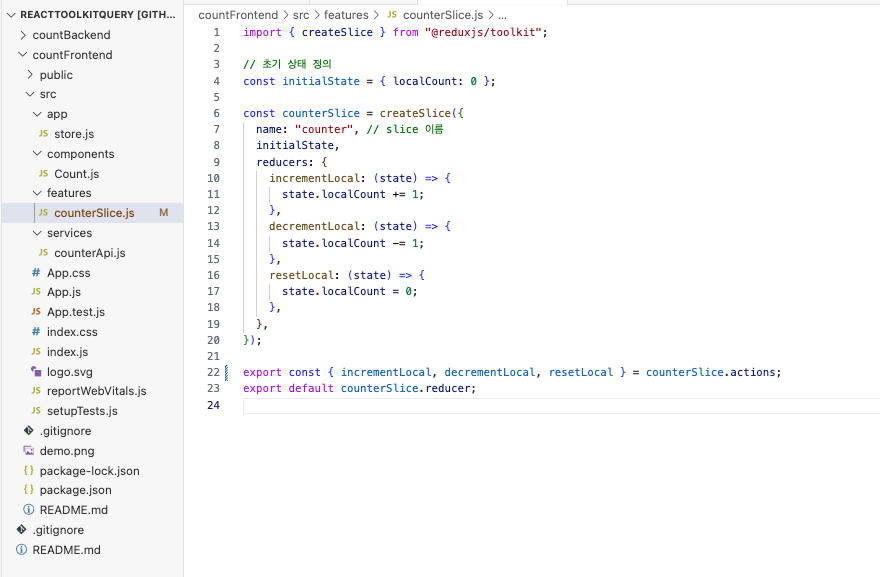
Step3. Managing Local State with Redux Slice
Now that we’ve seen how to display and update the count, let’s take a look at how local state is managed using a Redux slice.
import { createSlice } from "@reduxjs/toolkit";

// Initial state
const initialState = { localCount: 0 };

// Create a slice for local count
const counterSlice = createSlice({
  name: "counter",
  initialState,
  reducers: {
    incrementLocal: (state) => {
      state.localCount += 1;
    },
    decrementLocal: (state) => {
      state.localCount -= 1;
    },
    resetLocal: (state) => {
      state.localCount = 0;
    },
  },
});

// Export actions and reducer
export const { incrementLocal, decrementLocal, resetLocal } =
  counterSlice.actions;
export default counterSlice.reducer;
Here, we’ve defined a slice with three reducers:
incrementLocal: Increments the local count.
decrementLocal: Decrements the local count.
resetLocal: Resets the local count to zero.
These reducers are used in the component to update the local state.
Redux Toolkit automatically generates action creators for the reducers we defines, so we don’t need to write manually. Instead, we can directly use these action creators when dispatching actions.
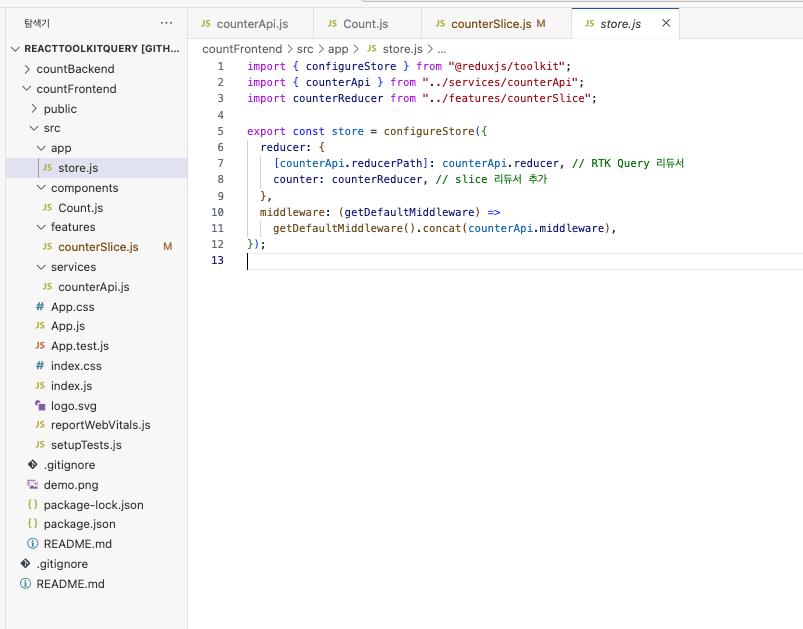
Step 4: Setting up the Store
Finally, we need to set up the Redux store and add both the RTK Query reducer and the slice reducer.
import { configureStore } from "@reduxjs/toolkit";
import { counterApi } from "../services/counterApi";
import counterReducer from "../features/counterSlice";

// Create the Redux store
export const store = configureStore({
  reducer: {
    [counterApi.reducerPath]: counterApi.reducer, // RTK Query reducer
    counter: counterReducer, // Slice reducer for local state
  },
  middleware: (getDefaultMiddleware) =>
    getDefaultMiddleware().concat(counterApi.middleware),
});
In this store:
counterApi.reducer: Manages the server state using RTK Query.
counterReducer: Manages the local count using Redux slice.
counterApi.middleware: Ensures that RTK Query can handle asynchronous requests properly.
✅
-
One of the key features of RTK Query is automatic
caching. When the same query is called multiple times with the same arguments, RTK Query will return the cached data instead of making a new request, improving performance and reducing unnecessary network calls. -
You can debug RTK Query easily by using Redux DevTools. RTK Query dispatches actions such as
pending,fulfilled, andrejectedduring the request lifecycle, allowing you to track the exact status of your API calls.
Conclusion
In this tutorial, we explored how to use Redux Toolkit Query to manage server-side state in a React application. We also learned how to manage local state using a Redux slice and how to integrate both into a single store.
- RTK Query simplifies data fetching by automatically managing the request lifecycle and caching.
- Redux slices help manage local state in a clean and predictable way.
- Combining RTK Query with Redux slices allows you to handle both server-side and local state seamlessly in your React app.
✔️ This code and complete example can be found on my ReactToolkitQuery repo.